If you’re using Bun v1.0.3 or lower, elysia-rate-limit v2.0.0 or higher will not be compatible. Please use elysia-rate-limitv1.3.0 instead.
Compatibility
As long as you’re on the latest version of Bun, and Elysia.
Using the latest version of elysia-rate-limit would works just fine.
However, please refer to the following table to determine which version to use.
Duration for requests to be remembered in milliseconds.
Also used in the Retry-After header when the limit is reached.
max
number
Default: 10
Maximum of request to be allowed during 1 duration timeframe.
errorResponse
string | Response | Error
Default: rate-limit reached
Response to be sent when the rate limit is reached.
If you define a value as a string,
then it will be sent as a plain text response with status code 429. If you define a value as a Response object,
then it will be sent as is.
And if you define a value as an Error object, then it will be thrown as an error.
import{HttpStatusEnum}from'elysia-http-status-code/status'exportclassRateLimitErrorextendsError{constructor(publicmessage: string='rate-limited',publicdetail: string='',publicstatus: number=HttpStatusEnum.HTTP_429_TOO_MANY_REQUESTS// or just 429){super(message)}}newElysia().use(rateLimit({errorResponse: newRateLimitError(),}))// use with error hanlder.error({rateLimited: RateLimitError,}).onError({as: 'global'},({ code })=>{switch(code){case'rateLimited':
returncodebreak}})
scoping
'global' | 'scoped'
Default: 'global'
Sometimes you may want
to only apply rate limit plugin to curtain Elysia instance.
This option will allow you
to choose scope local apply to only current instance and descendant only.
But by default,
rate limit plugin will apply to all instances that apply the plugin.
Custom key generator to categorize client requests, return as a string. By default, this plugin will categorize client by their IP address via server.requestIP() function.
If you deploy your server behind a proxy (i.e. NGINX, Cloudflare), you may need to implement your own generator to get client’s real IP address.
// IMPORTANT: Only use this if your server is behind Cloudflare AND// you've restricted access to only Cloudflare IPsconstcloudflareGenerator=(req,server)=>{// Verify the request is coming from Cloudflare// In production, you should maintain a list of Cloudflare IP ranges// and verify the request IP is in that rangeconstisFromCloudflare=verifyCloudflareIP(server?.requestIP(req)?.address)if(isFromCloudflare){// Only trust CF-Connecting-IP if the request comes from Cloudflarereturnreq.headers.get('CF-Connecting-IP')??server?.requestIP(req)?.address??''}// For non-Cloudflare requests, use the direct IPreturnserver?.requestIP(req)?.address??''}// Example function to verify Cloudflare IPs (implement this based on your needs)functionverifyCloudflareIP(ip){// In a real implementation, check if IP is in Cloudflare's IP ranges// https://www.cloudflare.com/ips/returntrue// Replace with actual implementation}
There’s a third argument
where you can use derive values from external plugin within key generator as well.
Only downsize is you have to definitely those types be yourself,
please be sure to test those values before actually defining types manually.
import{ip}from'elysia-ip'importtype{SocketAddress}from'bun'importtype{Generator}from'elysia-rate-limit'constipGenerator: Generator<{ip: SocketAddress}>=(_req,_serv,{ ip })=>{returnip}
countFailedRequest
boolean
Default: false
Should this plugin count rate-limit to user when request failed?
By default,
this plugin will refund request count to a client
when onError lifecycle called.
(Learn more in Lifecycle)
context
Context
Context for storing requests count for each client, if you want to implement your own Context you can write it to comply with Context protocol
By default, context implementation, caching will be an LRU cache with a maximum of 5,000 entries. If you prefer to use this cache implementation but with larger cache size, you can define a new context with preferred cache size as follows
import{DefaultContext}from'elysia-rate-limit'newElysia().use(rateLimit({// define max cache size to 10,000context: newDefaultContext(10_000),}))
headers
boolean
Default true
Should this plugin automatically set RateLimit-* headers to the response?
If you want to disable this feature, you can set this option to false.
A custom function
to determine that should this request be counted into rate-limit
or not based on information given by Request object
(i.e., Skip counting rate-limit on some route) and the key of the given request,
by default, this will always return false which means counted everything.
injectServer
() => Server
Default: undefined
A function to inject server instance to the plugin,
this is useful
when you want to use default key generator in detached Elysia instances.
You can check out the example here.
Please use this function as a last resort,
as defining this option will make plugin to make an extra function call,
which may affect performance.
Representational State Transfer ou Transferencia Representacional de Estado.
RESTFUL – padrão de criação de APIs. É a mesma coisa.
Interface de comunicação HTTP e APIs. Uma API é uma forma de comunicação.
ENDPOINTS
Em uma API temos elementos chamados resources, ou recursos.
Um recurso é um model na aplicação.
Com esses recursos realizamos operaçoes de CRUD (create, retrieve, update e delete) através da API.
Fazemos isso através de URIs, que são URLs internas.
Um endpoint pode representar uma coleção ou registros, ou mesmo registro individual.
Exemplo: coleção: /api/v1/produtos
VERBOS HTTP
PUT
GET
POST
DELETE
ENTENDENDO AS REQUESTS
Um dispositivo que faz uma requisição na nuvem/servidor.
ACESSO DA APLICAÇÃO NA ROTA: http://127.0.0.1:8000/
Acesso da área administrativa do Django: http://127.0.0.1:8000/admin
COMANDOS DJANGO:
STARTAR UM PROJETO: django-admin startproject school
STARTAR UM APP: django-admin startapp courses
FAZER AS MIGRAÇÕES: python manage.py makemigrations
APLICAR AS MIGRAÇÕES: python manage.py migrate
CRIAR UM SUPERUSUARIO: python manage.py createsuperuser
SUBIR SERVIDOR LOCAL PARA ACESSO DA ROTA: python manage.py runserver
CRIAÇÃO DA API REST
Com a aplicação Django já rodando, agora vamos fazer a instalação do Django Rest API:
INSTALAÇÃO DO DJANGO REST API: pip install djangorestframework markdown django-filter (adicionando a documentação + filtros)
INSTALLED APPS:
    'django_filters',
    'rest_framework',
    'courses',
PERMISSIONS E AUTHENTICATIONS NO DJANGO REST
Se o usuário for authenticado, então ele pode usar todas as rotas de post, delete, get e update. Caso contrário, só tem acesso ao get.
Abaixo a configuração para authenticar o usuário.
Página de login para autenticação e login do usuário: http://127.0.0.1:8000/api-auth/login/
Para fazer logout: http://127.0.0.1:8000/api-auth/logout/
Conseguimos apenas autenticar o usuário via sessão porque colocamos DEFAULT_AUTHENTICATION_CLASSES
SERIALIZERS
Com algumas linhas podemos transformar nossos models em objetos json para lidar com as requisições das nossas apis.
O serializers transformam objetos json e transformam em obj python, e vice versa (deserializers).
Json: formato de dados textual que é facilmente lidos;
Modelo de Serializer:
from rest_framework import serializers


class RatingSerializer(serializers.ModelSerializer):
    # create extra class configs
    class Meta:
        extra_kwargs = {
            # this field here sets that the email won't be showed when you see the api, only when an user registrate
            'email': {
                'write_only': True
            }
        }

        model = Rating

        # fields you want to show when the user access the api - all of this are existing fields of the main model
        field = (
            'id',
            'course',
            'name',
            'email',
            'comment',
            'creation_date',
            'active'
        )
The goal is to create a system for finding opportunities for free domain registration.
Available domain in the format LLLLN.com (AXCF1.COM, AFDW3.COM,…)
The chars and tld should be modified in the index.php file as follows:
$chars = array();
$chars[] = "*l"; //1 random letter;$chars[] = "*l"; //1 random letter;$chars[] = "*l"; //1 random letter;$chars[] = "*l"; //1 random letter;$chars[] = "*n"; //1 random number;$tld = "com";
Available domain in the format ABC(L/N)LNN.com (ABC9X11.COM, ABCPY22.com,…)
$chars[] = "A";
$chars[] = "B";
$chars[] = "C";
$chars[] = "*a"; //1 random char (letter or number);$chars[] = "*l"; //1 random letter;$chars[] = "**n"; //2 same random number;$tld = "com";
Installation steps
Download whois files from phpwhois and copy to “phpWhois/src/” folder.
Edit the “phpWhois/index.php” file and replace the API keys you received from the domain providers (Godaddy, Dynadot, and ResellerClub”). *
It is important to check with each domain provider the restrictions of the free API before using it.
Edit the “index.php” file and change the $chars and $tld values.
If you want a feature or a bug fixed, report it via project’s issues tracker. However, if it’s something you can fix yourself, fork the project, do whatever it takes to resolve it, and finally submit a pull request. I will personally thank you, and add your name to the list of contributors.
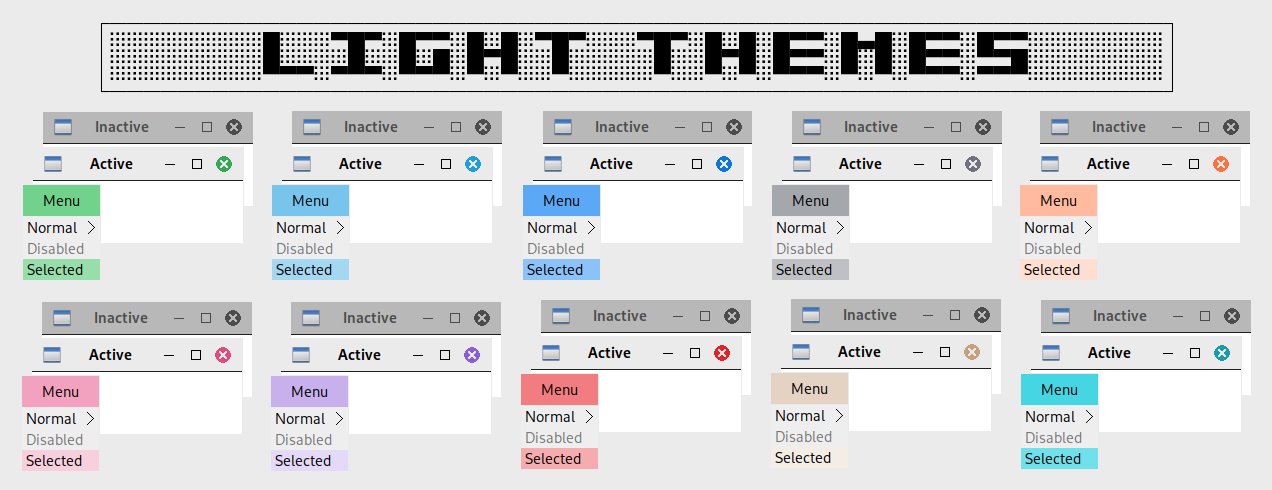
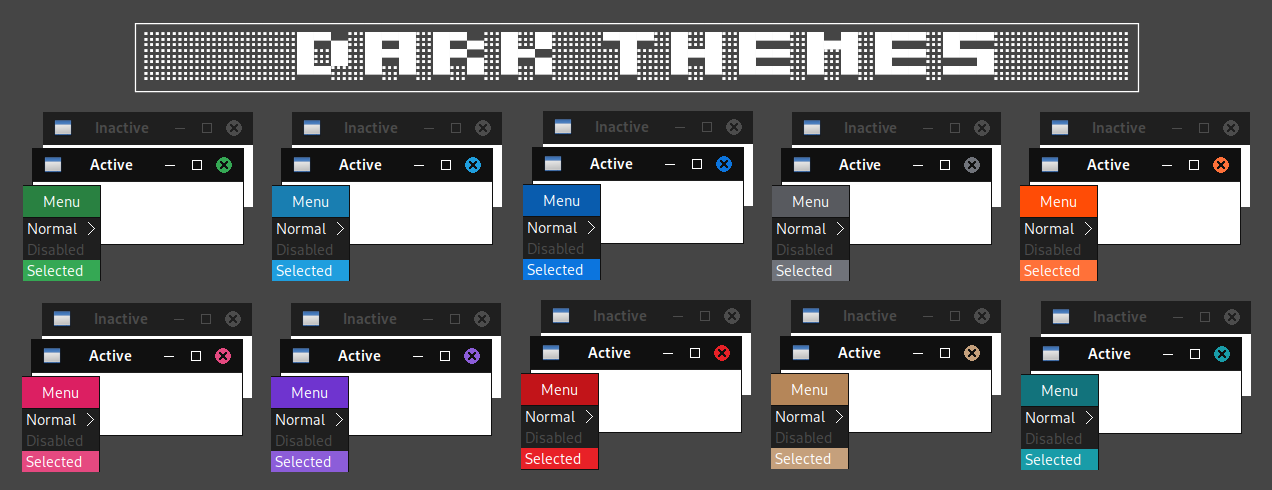
Mint O Themes are an adaptation (made by myself) of the well known Mint Y themes with the hope to bring a similar appearance to those themes to Openbox 3 users.
Ever since I started using Openbox, I always wanted themes like these ones. I never found any, so I researched a bit and decided to make them on my own and let other users enjoy them with ease.
This is still a work in progress and if you want to make some kind of contribution: please, do it! I’d love to receive some help and support to improve this project.
How to use this project?
Instead of creating all the themes one by one, I decided to make two templates: one for light variations of the themes and another for dark ones. I also created a script to apply the aproppiated colors to those templates, generate the themes and transfer them to where they should be placed to later set them as the theme for Openbox.
To setup the themes, the first thing you need to do is clone this repo by executing:
git clone https://github.com/jr20xx/Mint-O-Themes
After that, open the Mint-O-Themes folder by executing:
cd Mint-O-Themes
Then, the only thing left for you to do is to run the Python script and wait until it finishes its execution:
python3 install.py
Script parameters
The Python script provided to setup the themes can take two optional parameters:
--color: This parameter is used when you want to setup only a specific number of themes colors. You can pass a single color name or multiple colors separated by a whitespace. Admitted values are standard, aqua, blue, grey, orange, pink, purple, red, sand and teal.
--mode: This parameter is used when you want to generate only one variant of the themes. Admitted values are light or dark.
Examples of usage:
# To setup the dark red theme
python3 install.py --color red --mode dark
# To setup all the light themes
python3 install.py --mode light
# To setup the light variants of the standard and aqua themes
python3 install.py --color standard aqua --mode light
If no parameters are provided, then all the themes with their corresponding variants will be setted up.
How to setup the themes for all users?
That’s easy! All you got to do is run the script as root and the generated themes will be moved into a location where they can be accessed for every user.
For example, let’s say that you want to setup the dark variants of the blue and pink themes systemwide. All you must do is execute the following command and that would be it:
sudo python3 install.py --color blue pink --mode dark
This application is implemented in JavaScript based on Node.js.
Here is the detail of my coding environment:
OS: Windows 10
IDE: VS Code
Node.js Version: v10.13.0 (LTS 'Dubnium')
App entry: main.js
Input is from standard input. In order to run this application, go to Terminal and cd to the root directory, and then run node main.js
cd /YOUR_PATH_TO/robot/
node main.js
When you see a greeting message then you can start to type in command and enter (one command per line). The application will continue to receive command until you manually terminate the process (ctrl + c).
Thoughts
I utilised Command Pattern to implement this application, not only because the behavour of this problem fits well, but also providing potentials to further extension (undo feature, new commands, new way of inputting commands and etc.)
Test cases down below are summarised from the instruction of this problem and need to be tested manually, which can be improved. A more comprehensive approach could be writing proper user stories based on requirement in advance, and coding up unit test/behaviour test to automatically test the app.
Test Cases
Combined Example a, b, c from problem instruction
PLACE 0,0,NORTH
MOVE
REPORT
PLACE 0,0,NORTH
LEFT
REPORT
PLACE 1,2,EAST
MOVE
MOVE
LEFT
MOVE
REPORT
Expected output:
0,1,NORTH
0,0,WEST
3,3,NORTH
Prevent falling however allow further valid movement command
PLACE 100,100,NORTH
REPORT
PLACE 4,4,EAST
MOVE
REPORT
LEFT
MOVE
REPORT
PLACE 0,0,WEST
MOVE
REPORT
LEFT
MOVE
REPORT
Expected output:
4,4,EAST
4,4,NORTH
0,0,WEST
0,0,SOUTH
Discard all commands in the sequence until a valid PLACE command has been executed
LEFT
RIGHT
MOVE
PLACE 100,100,NORTH
REPORT
PLACE 0,0,NORTH
REPORT
Auto download all videos of some youtube channel and crop it into parts of 40 s to post them to the tick tok
NEW VERSION IS AVAILABLE NOW!!
What is new
Now you should run just one program. It will upload and crop the video itself
Absolute path to video folder works correctly
Get channel id by it’s name
Using faster lib to crop videos (x 150 – 200 %) boost
Using
Clone this repo git clone https://github.com/freQuensy23-coder/TikTok-content-farm
Get youtube api key and paste it into field youtube_api_key in config file
Install libs (pip install -r requirements.txt)
Select channel in youtube with memes or other trash content.
Copy it’s channel id to channel_id field. If you can’t find channel id in link, use channel id finder (second tool)
Run main.py and follow the instructions
Videos will be downloaded to folder you selected. Cropped videos will be saved to …_cropped folder
Publishing to TikTok
Send downloaded videos to your phone (for ex. using Google Drive)
Create new TikTok account with login as the name of the YouTube channel.
Publish one video per 6-8 hours.
If the content of the channel that you have found is really trashy, you can quickly (in a month) promote your channel on tick tok and sell your account by going to a profit.
Will be released in the next versions
Video preview and selection before downloading
Auto posting to Tik Tok using MIM proxy and unofficial API
// build.sbt// https://mvnrepository.com/artifact/io.github.greenleafoss/green-leaf-mongo-core// `green-leaf-mongo-core` can be used if you want to create your own extension// https://mvnrepository.com/artifact/io.github.greenleafoss/green-leaf-mongo-spray
libraryDependencies +="io.github.greenleafoss"%%"green-leaf-mongo-spray"%"3.1"// https://mvnrepository.com/artifact/io.github.greenleafoss/green-leaf-mongo-play
libraryDependencies +="io.github.greenleafoss"%%"green-leaf-mongo-play"%"3.1"// https://mvnrepository.com/artifact/io.github.greenleafoss/green-leaf-mongo-circe
libraryDependencies +="io.github.greenleafoss"%%"green-leaf-mongo-circe"%"3.1"
JSON and BSON protocols
GreenLeafMongoJsonBasicFormats based on DefaultJsonProtocol from Spray JSON and allows to override predefined JsonFormats to make possible use custom serialization in BSON format.
This trait also includes a few additional JsonFormats for LocalDate, LocalDateTime, ZonedDateTime, ObjectId, scala Enumeration and UUID.
CirceJsonProtocol is a related extension for the Circe JSON library, PlayJsonProtocol is for the Play JSON library and SprayJsonProtocol for the Spray JSON library.
More examples available in implementation of JsonProtocolSpec/BsonProtocolSpec in Spray, Play and Circe project modules.
GreenLeafMongoDsl
GreenLeafMongoFilterOps makes it possible to write queries with a syntax that is more close to real queries in MongoDB, as was implemented in Casbah Query DSL.
More examples of queries available in GreenLeafMongoFilterOpsSpec.
GreenLeafMongoDao
GreenLeafMongoDao extends GreenLeafMongoFilterOps with GreenLeafMongoObservableToFutureOps to provide a simple DSL to transform Mongo’s Observable[Document] instances to Future[Seq[T]], Future[Option[T]] and Future[T].
In addition, this trait provides many useful generic methods such as insert, getById, findById, updateById, replaceById and others.
SprayMongoDao/PlayMongoDao are related implementations for Spray and Play JSON libraries.
You can find more details and examples in the dao tests.
Web Path Finder is a Python program that provides information about a website. It retrieves various details such as page title, last updated date, DNS information, subdomains, firewall names, technologies used, certificate information, and more.
Features and Benefits
Retrieve important information about a website
Gain insights into the technologies used by a website
Identify subdomains and DNS information
Check firewall names and certificate details
Perform bypass operations for captcha and JavaScript content
This will install all the required modules and their respective versions.
Usage
Run the program using the following command:
┌──(root💀denizhalil)-[~/MyProjects/]
└─# python3 pathFinder.py --help
usage: pathFinder.py [-h] url

Web Information Program

positional arguments:
  url         Enter the site URL

options:
  -h, --help  show this help message and exit
Replace <url> with the URL of the website you want to explore.
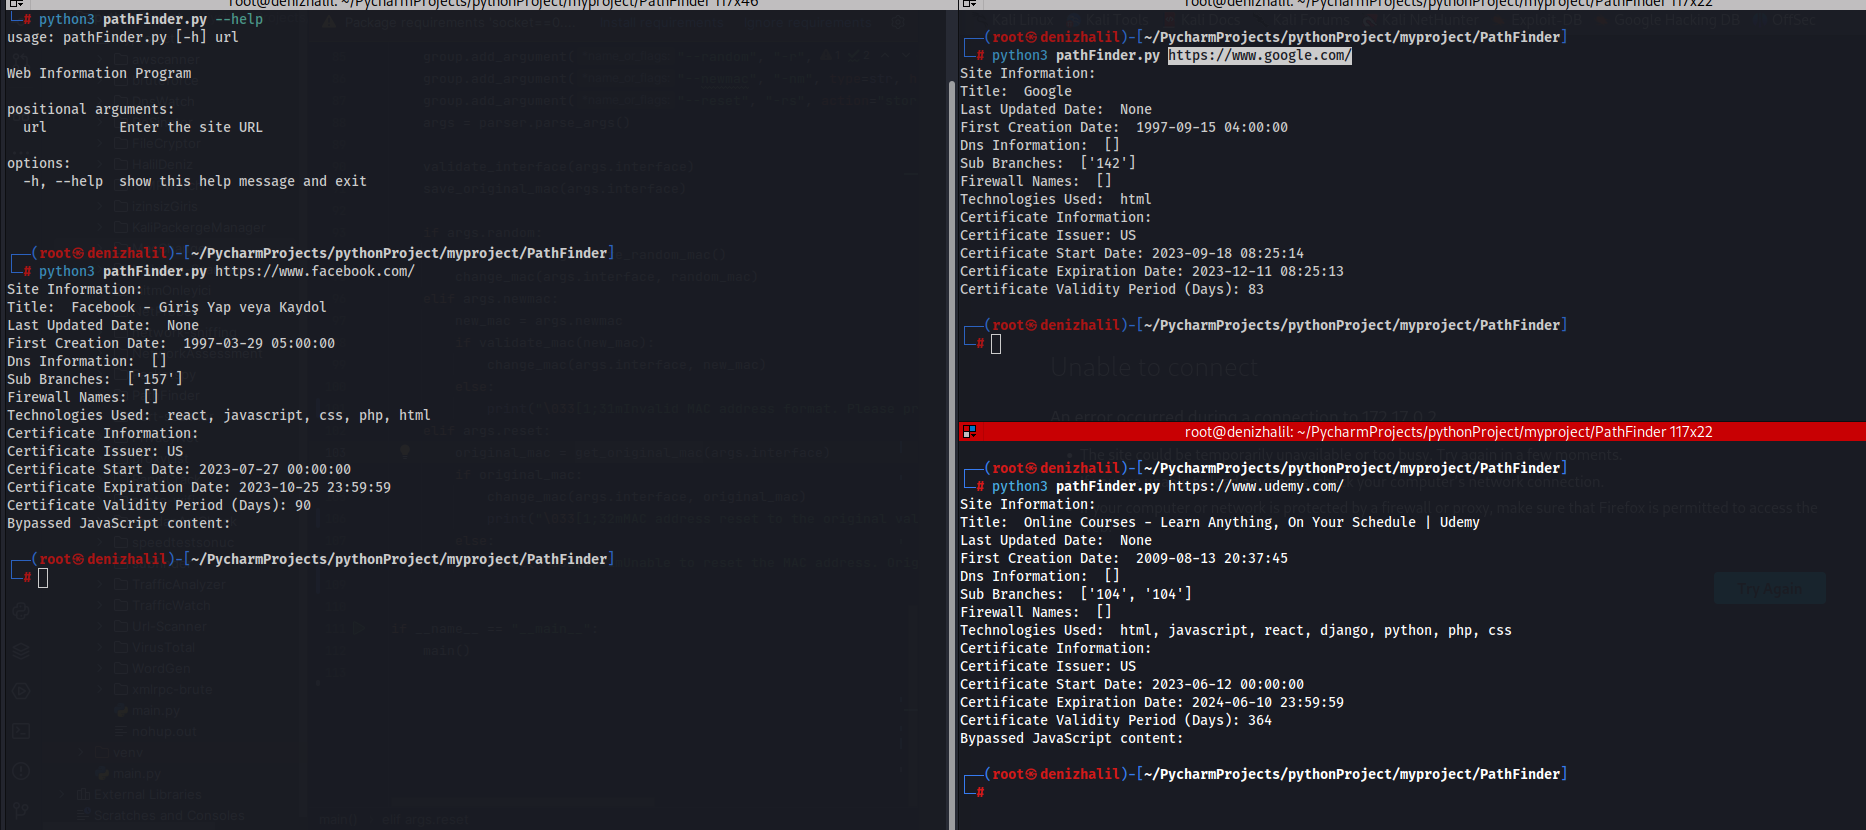
Example Output
Here is an example output of running the program:
┌──(root💀denizhalil)-[~/MyProjects/]
└─# python3 pathFinder.py https://www.facebook.com/
    Site Information:
    Title:  Facebook - Login or Register
    Last Updated Date:  None
    First Creation Date:  1997-03-29 05:00:00
    Dns Information:  []
    Sub Branches:  ['157']
    Firewall Names:  []
    Technologies Used:  javascript, php, css, html, react
    Certificate Information:
    Certificate Issuer: US
    Certificate Start Date: 2023-02-07 00:00:00
    Certificate Expiration Date: 2023-05-08 23:59:59
    Certificate Validity Period (Days): 90
    Bypassed JavaScript content:
Contributing
Contributions are welcome! To contribute to PathFinder, follow these steps:
Fork the repository.
Create a new branch for your feature or bug fix.
Make your changes and commit them.
Push your changes to your forked repository.
Open a pull request in the main repository.
Thanks
Thank you my friend Varol
License
This project is licensed under the MIT License – see the LICENSE file for details.
Contact
For any inquiries or further information, you can reach me through the following channels:
This guide will teach how you can store multiple variables inside a single variable, with the use of some functions. This way you can exceed the amount of maximum amount of variables by storing much information inside a variable.
In this guide we’ll learn to setup some basic economy commands along with other useful commands a normal bot would have (levelling up, shop with buy, balance, deposit and withdraw + bank limit).
I’m looking forward to see people actually understanding what this Guide is, so I will do my best to explain how everything based on “TextSplit” Variables works.
This is the very beginning of using a Textsplit variable.
For this, first of all you have to use the $textSplit function to split the values of a variable.
You’ll have to make a variable named anything preferable to you. This will be the variable we’ll use to make multiple variables. This is how the function would look like, when splitting the values inside the variable:
$textSplit[$getVar[VARIABLE;$authorID];.]
Since the variable we’re using will have multiple variables stored, this is how the default value should look:
This is how the value should look like, with each variables getting split by .
Each 0 represent each variable, so let’s just memorize what each variable is.
The first two zeroes are “money” and “bank”.
The next two zeroes are “bank limit” and “xp” (xp of user).
The rest of the zeroes are “req-exp” (required exp) and “level” (current level).
So now we have made 6 variables, we can now modify the values, and use it accordingly.
If you ever want to add more variables, just add . (the splitter to split the values) and then add values for each variable. Remember to keep an eye on the values because since we’re using Global variables, the maximum limit is 499 characters.
$editSplitText
This is how we modify each values once a variable is split using $textSplit. This is how the function is used:
This sets the value of the “money” variable to “1000”. So now we have the “money” variable with value “1000”.
An Index is a number that tells you which part of a split you want to use/modify.
Since “money” is 1, “bank” is 2, “bank-limit” is 3 and so on, each split has a number.
Value
The Value of an index is the text you want to replace with.
The example for this can be seen above this section.
$joinSplitText
$joinSplitText joins the split text with whatever you specify inside the value. Usage:
Never forget to use $joinSplitText inside $setVar. Make sure the joiner inside the argument should be whatever you’re splitting the variable with, or it would throw an error later.
For example:
$textSplit[$getVar[VARIABLE;$authorID];.]
$editSplitText[1;200] $c[setting value for "money" as 200.]
$setVar[VARIABLE;$joinSplitText[.];$authorID]
Always remember to use $joinSplitText inside $setVar with what you’re splitting the variable with.
$splitText
$splitText returns the value of the Index set inside the arguments. For example:
$textSplit[I-Love-Anime;-]
$splitText[2]
It will return: Love.
This will be pretty useful when using TextSplit Variables and to return values of a specific Index.
Now let’s try retrieveing the Value of our variable we created before:
Now that we’ve learned some functions of $textSplit and it’s relatives, let’s now try making the commands using these.
Balance Command
This is how a simple Balance code would look like:
$textSplit[$getVar[VARIABLE;$mentioned[1;yes]];.]
$if[$splitText[3]==0]
$editSplitText[3;1000]
$c[set the current bank limit value to 1000 if the value is 0. (thats the default, you can change it)]
$setVar[VARIABLE;$joinSplitText[.];$authorID]
$endif
Balance: $$numberSeparator[$splitText[1]]
Bank: $$numberSeparator[$splitText[2]]/$$numberSeparator[$splitText[3]]
This command shows how much balance and Bank balance you have, along with Bank Capacity.
I also set if so that the current value of maximum bank limit is 0, it will be set to 1000 (you can change this value, or set in manually through the app and remove that part of the code).
Always remember to use:
$textSplit[$getVar[VARIABLE;$authorID];.]
At the top of your code wherever you use TextSplit Variables, so the bot understands what variable to be split and to be retrieved.
Deposit Command
Now let’s see how we can make a Deposit command with TextSplit Usage. For this, start off with $textSplit:
$nomention
$textSplit[$getVar[VARIABLE;$authorID];.]
$if[$splitText[3]==0]
$editSplitText[3;1000]
$c[set the current bank limit value to 1000 if the value is 0. (thats the default, you can change it)]
$setVar[VARIABLE;$joinSplitText[.];$authorID]
$endif
$onlyIf[$isNumber[$message]==true;You can only deposit money in numbers.]
$onlyIf[$message!=;Include how much do you want to deposit.]
$onlyIf[$message<=$splitText[1];Your amount should not exceed how much money you have!]
$onlyIf[$message>0;Your amount should be greater than 0.]
$onlyIf[$splitText[2]<$splitText[3];Your maximum Bank Limit reached. You cannot deposit anymore.]
$onlyIf[$splitText[2]!=$splitText[3];Your maximum Bank Limit reached. You cannot deposit anymore.]
$onlyIf[$splitText[1]>0;You don't have any money in balance to deposit.]
$onlyIf[$message<=$splitText[3];You cannot exceed your bank limit.]
$onlyIf[$sum[$splitText[2];$message]<=$splitText[3];You cannot exceed the bank limit.]
$reply
$allowUserMentions[]
$username, you deposited **$$message** into the bank.
$editSplitText[2;$sum[$splitText[2];$message]]
$editSplitText[1;$sub[$splitText[1];$message]]
$setVar[VARIABLE;$joinSplitText[.];$authorID]
$c[always remember to use joinSplitText after setting values.]
That’s it, pretty easy right? The withdraw command is easy too. Just like this, vice versa and not much limiters related to bank limit, since we’re not gonna need that for withdrawing.
Withdraw Command
A simple withdraw command would look like this:
$nomention
$textSplit[$getVar[VARIABLE;$authorID];.]
$if[$splitText[3]==0]
$editSplitText[3;1000]
$c[set the current bank limit value to 1000 if the value is 0. (thats the default, you can change it)]
$setVar[VARIABLE;$joinSplitText[.];$authorID]
$endif

$onlyIf[$message!=;Include how much do you want to withdraw.]
$onlyIf[$splitText[2]>0;You don't have any money in the bank to withdraw.]
$onlyIf[$message<=$splitText[2];You cannot withdraw more than you have in the bank.]
$onlyIf[$message>0;Your amount should be greater than 0.]
$onlyIf[$isNumber[$message]==true;Your amount should be in numbers.]
$username, you withdrawn **$$message** from the bank.

$editSplitText[1;$calculate[$splitText[1]+$message]]
$editSplitText[2;$calculate[$splitText[2]-$message]]
$setVar[VARIABLE;$joinSplitText[.];$authorID]
Just that’s it, now you have a working withdraw, deposit and balance command with bank limit all in a single variable!
Now, let’s learn how we can make Levelling System with the rest of the variables we made before.
Now let’s see how we can make a Level Up checker, that checks if the user has reached X amount of exp, so that the user will advance to the next level, using the variables made inside the main variable.
Level Up Checker
This checks if the User has exceeded the amount of “Required XP” variable, and if they did, they are advanced to the next level.
$nomention
$textSplit[$getVar[VARIABLE;$authorID];.]
$if[$splitText[6]==0] $c[Since the default value is set 0, let's check if it's 0, the level is set to 1, and Required EXP is set to the amount you want. For me, I'm setting "100" as the Level 1 required EXP.]
$editSplitText[6;1]
$editSplitText[5;100] $c[required EXP set to 100 now.]
$setVar[VARIABLE;$joinSplitText[.];$authorID] $c[saving the variable]
$endif
$c[I'm also going to copy paste the "bank limit" checker below so it checks if it's 0, it sets to 1000. You can defaultly change the values of these variables right in the app so you don't want to put these lines of code everytime you make a command.]
$if[$splitText[3]==0]
$editSplitText[3;1000]
$c[set the current bank limit value to 1000 if the value is 0. (thats the default, you can change it)]
$setVar[VARIABLE;$joinSplitText[.];$authorID]
$endif
$if[$splitText[4]>=$splitText[5]]
$c[if XP reaches or goes more than Required EXP]
$editSplitText[6;$sum[$splitText[6];1]] $c[Increases Level by 1 each time user levels up.]
$editSplitText[4;0] $c[EXP set to 0 once leveled up.]
$editSplitText[5;$sum[$splitText[5];100]] $c[Required XP set to +100 while every time user levels up.]
$setVar[VARIABLE;$joinSplitText[.];$authorID]
$endif
That’s it, it was this simple. If you don’t want to always copy paste the “bank limit” and Level checker everytime when making a new command, you can defaultely set the values to whatever you want in the app, so you don’t want to get annoyed, like this:
In this image, I’ve set default values of Bank Limit to 1000, Required EXP to 100 and Level to 1, so I don’t want to copy paste the code to manually check it.
That’s it, now let’s focus on the final command: Shop Command.
Shop Command
For this, we have to make a seperate variable for adding the following items:
Apple
Banana
Watermelon
Orange
Mango
These are some example items that I’m going to add in the shop, you can customize or rename these items to what you want. This is just for an example as this is a Guide. So now, I’m going to create a new variable named “ITEMS” with the Value set the following:
There are 5 variables, with them being seperated again with .
Since there are 5 fruits that are being added in the shop, 5 variables with each having a seperator as . between them.
TO REMEMBER:
DO NOT add the seperator at the beginning of the Variable Value (Before the first variable) and at the end of the variable (After the last variable), unless you’re planning to make empty valued variables.
This is how the code looks like, with adding basic embed examples:
$nomention
$reply
$allowUserMentions[]
$title[Shop]
$description[

Mango: $30
Apple - $50
Banana - $60
Orange - $90
Watermelon - $120]
$footer[$username]
$addTimestamp
$color[00ff00] $c[adding color for a clean shop]
There. Since it’s a pretty visual code and there’s nothing to be done in it, there’s only a title, description, color and a timestamp put in the code, not too much detail. You can make the shop command anyway you like.
Buy Command
This is a basic buy command that checks if the item exists in the shop, and if not then it outputs an error message.
$nomention
$reply
$allowUserMentions[]
$textSplit[$getVar[VARIABLE;$authorID];.]
$var[money;$splitText[1]]
$onlyIf[$message!=;What do you want to buy from the Shop?]
$if[$toLowercase[$message]==mango]
$onlyIf[$var[money]>=30;You need $30 to buy a Mango.] $c[checking if the user has money.]
$username, you bought a **Mango** for **$30**.
$textSplit[$getVar[ITEMS;$authorID];.]
$editSplitText[1;$sum[$splitText[1];1]] $c[Increases 1 per each purchase.]
$setVar[ITEMS;$joinSplitText[.];$authorID] $c[saving it]
$textSplit[$getVar[VARIABLE;$authorID];.]
$editSplitText[1;$sub[$splitText[1];30]] $c[Removing $30 from User's balance.]
$setVar[VARIABLE;$joinSplitText[.];$authorID] $c[saving the variable.]

$elseif[$toLowercase[$message]==apple]
$onlyIf[$var[money]>=50;You need $50 to buy an Apple.] $c[checking if the user has money.]
$username, you bought an **Apple** for **$50**.
$textSplit[$getVar[ITEMS;$authorID];.]
$editSplitText[2;$sum[$splitText[2];1]] $c[Increases 1 per each purchase.]
$setVar[ITEMS;$joinSplitText[.];$authorID] $c[saving it]
$textSplit[$getVar[VARIABLE;$authorID];.]
$editSplitText[1;$sub[$splitText[1];50]] $c[Removing $50 from User's balance.]
$setVar[VARIABLE;$joinSplitText[.];$authorID] $c[saving the variable.]

$elseif[$toLowercase[$message]==banana]
$onlyIf[$var[money]>=60;You need $60 to buy a Banana.] $c[checking if the user has money.]
$username, you bought a **Banana** for **$60**.
$textSplit[$getVar[ITEMS;$authorID];.]
$editSplitText[3;$sum[$splitText[3];1]] $c[Increases 1 per each purchase.]
$setVar[ITEMS;$joinSplitText[.];$authorID] $c[saving it]
$textSplit[$getVar[VARIABLE;$authorID];.]
$editSplitText[1;$sub[$splitText[1];60]] $c[Removing $60 from User's balance.]
$setVar[VARIABLE;$joinSplitText[.];$authorID] $c[saving the variable.]

$elseif[$toLowercase[$message]==orange]
$onlyIf[$var[money]>=90;You need $90 to buy an Orange.] $c[checking if the user has money.]
$username, you bought an **Orange** for **$90**.
$textSplit[$getVar[ITEMS;$authorID];.]
$editSplitText[4;$sum[$splitText[4];1]] $c[Increases 1 per each purchase.]
$setVar[ITEMS;$joinSplitText[.];$authorID] $c[saving it]
$textSplit[$getVar[VARIABLE;$authorID];.]
$editSplitText[1;$sub[$splitText[1];90]] $c[Removing $90 from User's balance.]
$setVar[VARIABLE;$joinSplitText[.];$authorID] $c[saving the variable.]

$elseif[$toLowercase[$message]==watermelon]
$onlyIf[$var[money]>=120;You need $120 to buy a Watermelon.] $c[checking if the user has money.]
$username, you bought a **Watermelon** for **$120**.
$textSplit[$getVar[ITEMS;$authorID];.]
$editSplitText[5;$sum[$splitText[5];1]] $c[Increases 1 per each purchase.]
$setVar[ITEMS;$joinSplitText[.];$authorID] $c[saving it]
$textSplit[$getVar[VARIABLE;$authorID];.]
$editSplitText[1;$sub[$splitText[1];120]] $c[Removing $120 from User's balance.]
$setVar[VARIABLE;$joinSplitText[.];$authorID] $c[saving the variable.]

$else
Couldn't find the item you're looking for.
$endif
This is a basic buy command with the existing items I added in my shop command. You can replace my Items with your Items and Price, since the Shop and Buy Command are pretty self explanatory. If you ever felt like making an advance Server Shop Setup that the Shop can be customized for each server, I had posted a wiki in the Official BDFD Server. You can integrate those codes with this to make this more better.
With this method, you can make over 50 variables in a single variable (55 to be exact), with each variable holding approximately 8 characters long values.
I guess that’s it, thank you for following the whole Guide, and those who read the whole Guide until here, you’re a real one. Whole Guide done by: kitten_tenacious
If you ever face any error, please DM me or create a forum in Support then ping me. I hope you understand this Guide, because this can be a pretty save for your variables.


 https://github.com/rayriffy/elysia-rate-limit