Chip-8 is a simple, interpreted, programming language which was first used on some do-it-yourself computer systems in the late 1970s and early 1980s. The COSMAC VIP, DREAM 6800, and ETI 660 computers are a few examples. These computers typically were designed to use a television as a display, had between 1 and 4K of RAM, and used a 16-key hexadecimal keypad for input. The interpreter took up only 512 bytes of memory, and programs, which were entered into the computer in hexadecimal, were even smaller.
Nacos (official site: nacos.io) is an easy-to-use platform designed for dynamic service discovery and configuration and service management. It helps you to build cloud native applications and microservices platform easily.
Nacos makes it simple for services to register themselves and to discover other services via a DNS or HTTP interface. Nacos also provides real-time health checks of services to prevent sending requests to unhealthy hosts or service instances.
Dynamic Configuration Management
Dynamic Configuration Service allows you to manage configurations of all services in a centralized and dynamic manner across all environments. Nacos eliminates the need to redeploy applications and services when configurations are updated, which makes configuration changes more efficient and agile.
Dynamic DNS Service
Nacos supports weighted routing, making it easier for you to implement mid-tier load balancing, flexible routing policies, flow control, and simple DNS resolution services in the production environment within your data center. It helps you to implement DNS-based service discovery easily and prevent applications from coupling to vendor-specific service discovery APIs.
Service and MetaData Management
Nacos provides an easy-to-use service dashboard to help you manage your services metadata, configuration, kubernetes DNS, service health and metrics statistics.
Quick Start
It is super easy to get started with your first project.
Deploying Nacos on cloud
You can deploy Nacos on cloud, which is the easiest and most convenient way to start Nacos.
Use the following Nacos deployment guide to see more information and deploy a stable and out-of-the-box Nacos server.
On the Linux/Unix/Mac platform, run the following command to start server with standalone mode:
sh startup.sh -m standalone
On the Windows platform, run the following command to start server with standalone mode. Alternatively, you can also double-click the startup.cmd to run NacosServer.
Join us from DingDing(Group 1: 21708933(full), Group 2: 30438813(full), Group 3: 31222241(full), Group 4: 12810027056).
DingDing Group QR Code
DingDing MCP Group QR Code
WeChat Group QR Code
Enterprise Service
If you need Nacos enterprise service support, or purchase cloud product services, you can join the discussion by scanning the following DingTalk group. It can also be directly activated and used through the microservice engine (MSE) provided by Alibaba Cloud.
https://cn.aliyun.com/product/aliware/mse?spm=nacos-website.topbar.0.0.0
These are only part of the companies using Nacos, for reference only. If you are using Nacos, please add your company here to tell us your scenario to make Nacos better.
This domain manager is a solution for people who manage multiple domains in a linux environment. After installation, this system will help to automate some of your tasks as follows:
Suppose you just built your project and deployed it. Your project is now ready for launch, but it is currently running on 192.168.123.456:8000 but you want it accessible through example.com. Lucky for you, you have this domain manager up and running.
You log into the system and create a domain called example.com and its proxy you set as 192.168.123.456:8000. Having done that, you open a new tab and go to example.com, and voila! Your project is ready for launch!
When you create a domain in the system, a reverse proxy and a service file will be created automatically for the domain. Therefore, if your project is running on 192.168.123.456:8000 and you have created its domain as example.com, you will now be able to access the it through example.com
How To Install
This project was built using Laravel 10. Therefore, you need to have composer in your environment. If you do not have composer installed read here for more information about composer.
You may clone this project on github directly or using composer composer create-project jessyledama/domain-manager
Once the installation process is complete, you may cd into your project cd domain-manager
Migrate your database php artisan migrate
Seed test data php artisan db:seed
Start the project php artisan serve
Once the system runs, it will be available on localhost:8000 or as displayed in the terminal.
Setting Up Domains
Once your server is running, you can access it on the browser then follow the following steps:
Log in
Create a path for your proxy file (default is /etc/apache2/sites-available/domain.conf)
Create a path for your service file (default is /etc/systemd/system/domain.service)
Create a domain.
The system creates a sites-available file (/etc/apache2/sites-available/domain.conf) aka reverse proxy.
The system creates a service (/etc/systemd/system/domain.service).
Once these steps have been completed, your project is now accessible on domain.com and www.domain.com
Why Domain Manager
This domain manager keeps a list of your domains in the database. As such, should any file be deleted, the system will automatically recreate the files.
This ensures that all your domains run smoothly.
From The Author
This domain manager was developed and is maintained by Jessy Ledama as a free open source solution. You are free to use it as you please.
Security Vulnerabilities
If you discover a security vulnerability within this package, please send an e-mail to Jessy Ledama via sirjayliste@gmail.com. All security vulnerabilities will be promptly addressed.
License
This Domain Manager is open-sourced software licensed under the MIT license.
We believe in a future in which the web is a preferred environment for numerical computation. To help realize this future, we’ve built stdlib. stdlib is a standard library, with an emphasis on numerical and scientific computation, written in JavaScript (and C) for execution in browsers and in Node.js.
The library is fully decomposable, being architected in such a way that you can swap out and mix and match APIs and functionality to cater to your exact preferences and use cases.
When you use stdlib, you can be absolutely certain that you are using the most thorough, rigorous, well-written, studied, documented, tested, measured, and high-quality code out there.
To join us in bringing numerical computing to the web, get started by checking us out on GitHub, and please consider financially supporting stdlib. We greatly appreciate your continued support!
isNull
Test if a value is null.
Installation
npm install @stdlib/assert-is-null
Alternatively,
To load the package in a website via a script tag without installation and bundlers, use the ES Module available on the esm branch (see README).
If you are using Deno, visit the deno branch (see README for usage intructions).
The branches.md file summarizes the available branches and displays a diagram illustrating their relationships.
To view installation and usage instructions specific to each branch build, be sure to explicitly navigate to the respective README files on each branch, as linked to above.
This package is part of stdlib, a standard library for JavaScript and Node.js, with an emphasis on numerical and scientific computing. The library provides a collection of robust, high performance libraries for mathematics, statistics, streams, utilities, and more.
For more information on the project, filing bug reports and feature requests, and guidance on how to develop stdlib, see the main project repository.
We also suggest to enable “Show verbose output” options on “compilation” and “upload” in Preference for easier debugging.
Install Ameba board in “Board Manager”
Open “Tools” -> “Board” -> “Board Manager”, wait for it to update additional hardware configurations, then type “ameba” in the search bar, you will see Realtek Ameba in the list.
Press “Install” to start the installation.
Select your Ameba model in “Tools” -> “Board” -> “AmebaD ARM (32-bits) Boards”
Make sure you select the correct model for your board, otherwise your program might not work properly
Now you are ready to develop and upload firmware onto Ameba.
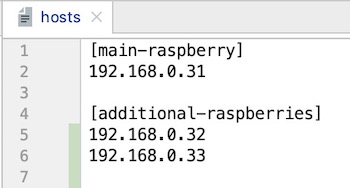
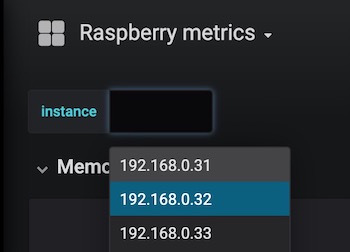
Edit file ansible/hosts and set Raspberry IP address in main-raspberry group.
If you have more than one Raspberry PI, configure additional Raspberry PI addresses in additional-raspberries group.
Here is the example:
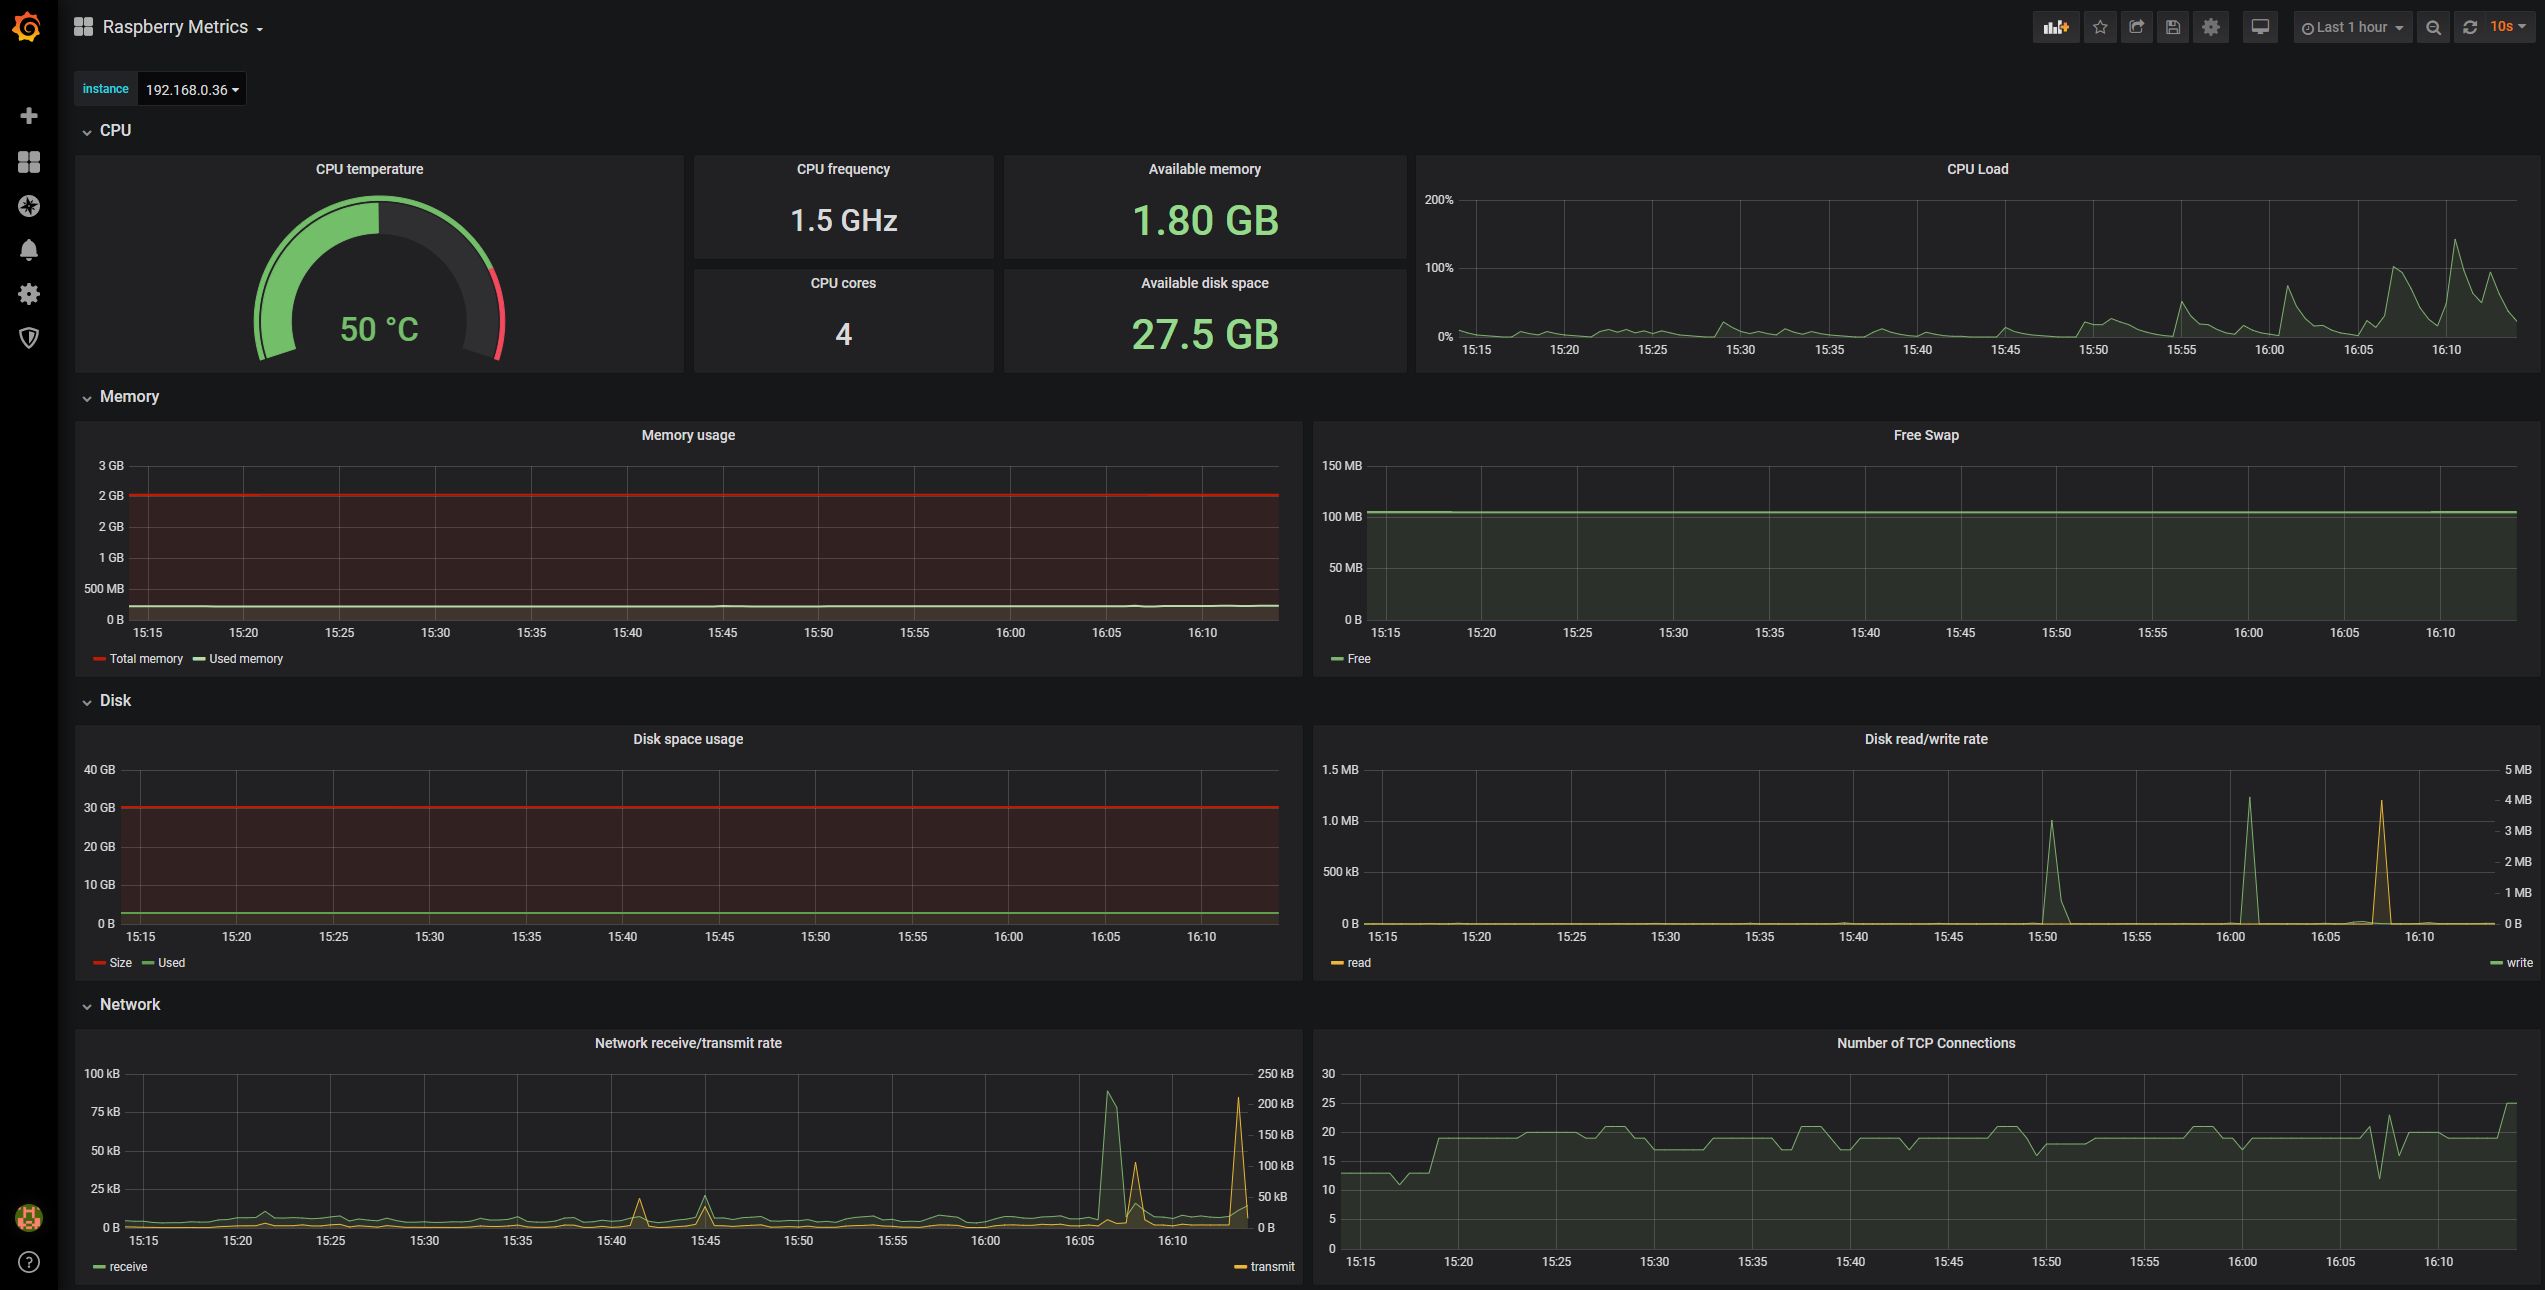
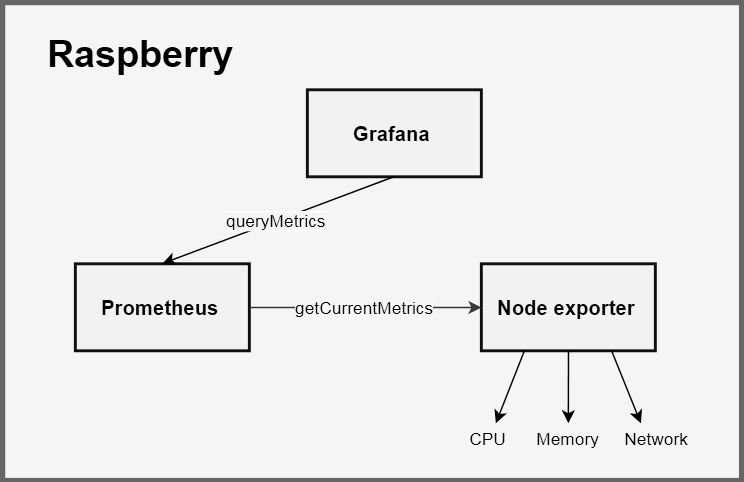
The “main” Raspberry will have all 4 services installed (Prometheus, Node exporter, rpi_exporter and Grafana),
and the “additional Raspberries” will have Node exporter and rpi_exporter service installed.
The main Raspberry will collect metrics from all additional Raspberries (if configured), so they must be accessible from the main Raspberry.
2. Run ansible playbook
Run Ansible playbook with password authentication:
    cd ansible/
    ansible-playbook raspberry.yml -i hosts -u pi -D -k -K
Or run Ansible playbook with SSH keys authentication:
    cd ansible/
    ansible-playbook raspberry.yml -i hosts -u pi -D
In Laravel 11, the default EventServiceProvider provider was removed. Instead, add the listener using the listen method on the Event facade, in your AppServiceProviderboot method.
Note: You do not need to add anything for the built-in socialite providers unless you override them with your own providers.
Sparse Partial Least Squares (Sparse PLS) Regression
Introduction
The Sparse Partial Least Squares (Sparse PLS) project implements a regression model that combines dimensionality reduction with variable selection. This model is particularly useful for high-dimensional datasets where interpretability and feature selection are important. By incorporating sparsity into the Partial Least Squares (PLS) regression framework, the model selects the most relevant features while capturing the underlying relationship between predictors and responses.
Features
Dimensionality Reduction: Reduces the dataset to a lower-dimensional latent space.
Variable Selection: Introduces sparsity to select the most relevant features.
Customizable Scaling: Supports data preprocessing with different scaling methods.
Hyperparameter Optimization: Includes methods for cross-validation and hyperparameter tuning.
Scikit-learn Compatibility: Designed to integrate seamlessly with scikit-learn’s ecosystem.
Ensure that all dependencies are installed before running the project. The requirements.txt file contains all the necessary packages and their versions.
Usage
Example Workflow
importpandasaspdfrommodelimportSparsePLSfrompreprocessingimportDataPreprocessorfromsklearn.model_selectionimporttrain_test_split# Load your datasetdata=pd.read_csv('your_dataset.csv')
X=data.drop('target_column', axis=1)
y=data['target_column']
# Split into training and testing setsX_train, X_test, y_train, y_test=train_test_split(
X, y, test_size=0.2, random_state=42
)
# Initialize the modelmodel=SparsePLS(n_components=2, alpha=0.5)
# Fit the modelmodel.fit(X_train, y_train)
# Transform the dataX_scores=model.transform(X_test)
# Predict target valuesy_pred=model.predict(X_test)
# Optimize hyperparametersparam_grid= {
'n_components': [1, 2, 3],
'alpha': [0.1, 0.5, 1.0]
}
model.optimize_parameters(
X_train, y_train,
param_grid=param_grid,
cv=5,
scoring='neg_mean_squared_error',
n_jobs=-1,
verbose=1
)
# Access selected variablesselected_features=model.feature_names_in_[model.selected_variables_]
print("Selected Features:")
print(selected_features)
Classes and Methods
SparsePLS Class
Overview
The SparsePLS class implements the Sparse Partial Least Squares regression model. It performs both dimensionality reduction and variable selection by introducing sparsity into the PLS framework.
Initialization Parameters
n_components (int, default=2): Number of components to extract.
max_iter (int, default=500): Maximum number of iterations.
tol (float, default=1e-6): Tolerance for convergence.
scale (bool, default=True): Whether to scale the data.
scale_method (str, default=’standard’): Scaling method to use.
**kwargs: Additional keyword arguments for the scaler.
Key Methods
fit(X, Y): Fits the model to the data.
transform(X): Transforms new data using the learned components.
fit_transform(X, Y): Fits the model and transforms the data.
predict(X): Predicts target values for new data.
optimize_parameters(X, Y, param_grid, cv, scoring, n_jobs, verbose, return_models): Optimizes hyperparameters using cross-validation.
Attributes
x_weights_: Weights for predictors.
y_weights_: Weights for responses.
x_loadings_: Loadings for predictors.
y_loadings_: Loadings for responses.
x_scores_: Scores for predictors.
y_scores_: Scores for responses.
coef_: Regression coefficients.
selected_variables_: Indices of selected variables.
feature_names_in_: Feature names seen during fitting.
cv_results_: Cross-validation results.
DataPreprocessor Class
Overview
The DataPreprocessor class handles data scaling and preprocessing. It supports different scaling methods and ensures that the data is appropriately transformed before modeling.
Initialization Parameters
method (str, default=’standard’): Scaling method to use.
**kwargs: Additional arguments specific to the scaling method.
Key Methods
fit(X): Fits the scaler to the data.
transform(X): Transforms the data using the fitted scaler.
fit_transform(X): Fits the scaler and transforms the data.
inverse_transform(X_scaled): Reverts the data to its original scale.
Mathematical Background
Partial Least Squares (PLS)
PLS regression seeks to find latent components that capture the maximum covariance between predictors (X) and responses (Y). It projects both X and Y into a lower-dimensional space.
Introducing Sparsity
Sparse PLS incorporates sparsity by applying an $\ell_1$-norm penalty on the weight vectors, encouraging many coefficients to be zero. This results in variable selection and enhances interpretability.
Optimization Problem
The optimization problem in Sparse PLS can be formulated as:
Note: Ensure that the preprocessing.py file containing the DataPreprocessor class is included in your project directory. This file should define the class and methods as used in the SparsePLS class.
Disclaimer: This README provides a high-level overview of the project. For detailed information, please refer to the code documentation and docstrings within the codebase.
NOCPP is the result of a project at the Ostwestfalen-Lippe University of Applied Sciences. It was developed by students of the Computer Engineering course. The client for this project is the company rt-solutions.de, which provides advice and solutions in information and OT security.
NOCPP is an application for targeted pentesting of a charging station. The OCPP connection between the Charge Point (CP) and the Charge Station Management System (CSMS) is used as an attack parameter. In addition to various selected fuzzing attack scenarios, information gathering is also implemented. New attack scenarios can be easily implemented using a state machine. The results of the attacks, configurations and tests are exported in a results PDF.
This project is based on the Open-Source OCPP implementation in Python by The Mobility House, which you can find here.
⚠️ Further Project Development
The version of nocpp published here is the first development of this software. Future developments will be published exclusively on Gitlab,in this repository..
💾 Charge Point support
Currently OCPP 1.6-J (JSON) is the only supported version.
The application was tested on a charging station from the manufacturer Weidmüller, model AC Smart Advanced.
🚀 System Requirements
Please make sure you use Python version 3.10 or higher.
NOCPP only works with the websockets library in the specific version 12.0.
✅ Getting Started
At this point I would like to emphasize once again that this software is only a prototype as a proof of concept. It cannot therefore be ruled out that it may contain errors.
To execute the application, run Main.py.
For automation, the following console arguments can be passed to the script for execution.
skip-websocket-config (Skips the manual WebSocket setup and uses default values. This argument blocks the set arguments.)
set-ip-address=[ipv4-address] (Set a specific IPv4 Address, uses default if the specified address is invalid.)
set-port=[port] (Set a specific port, uses default if the specified port is invalid.)
💣 Attack Szenarios
NOCPP uses various attack techniques, including inserting different data types and data values, as well as code injection. Please note that the effectiveness of this tool varies depending on the charging station. NOCPP recognizes successful system requests as well as error messages. In the event of a connection interruption (timeout), this is noted and the program is safely shut down. Due to the asynchronous program structure, this process can take significantly longer than the generation of the result PDF.
The execution of the attack scenarios can be variably adapted in the state machine contained in the CSMS.py file. New attack scenarios can also be easily added.
For the implementation of the attack scenarios, I recommend using the OCPP specification. However, the implementation on the respective charging stations can differ (significantly).
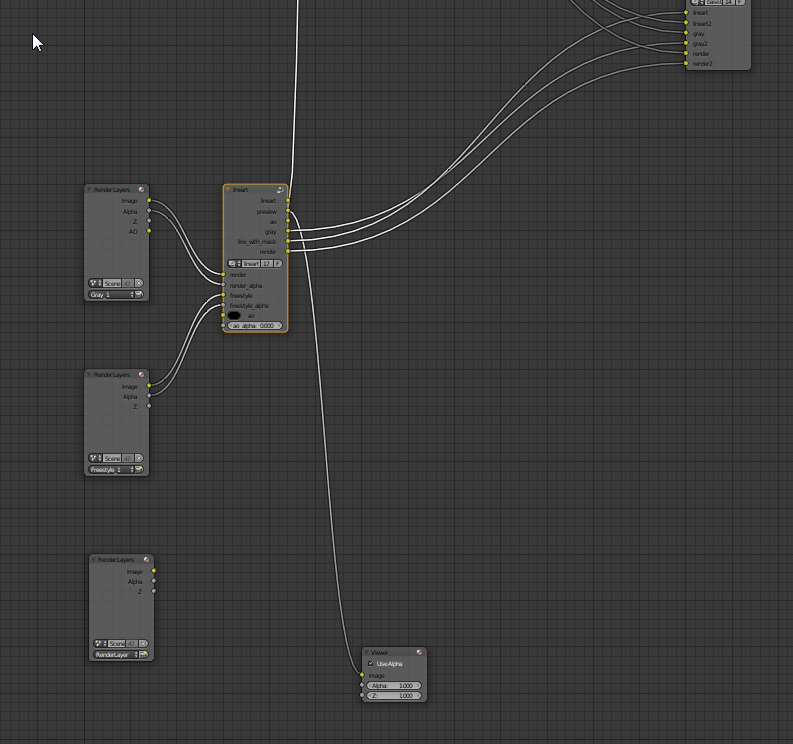
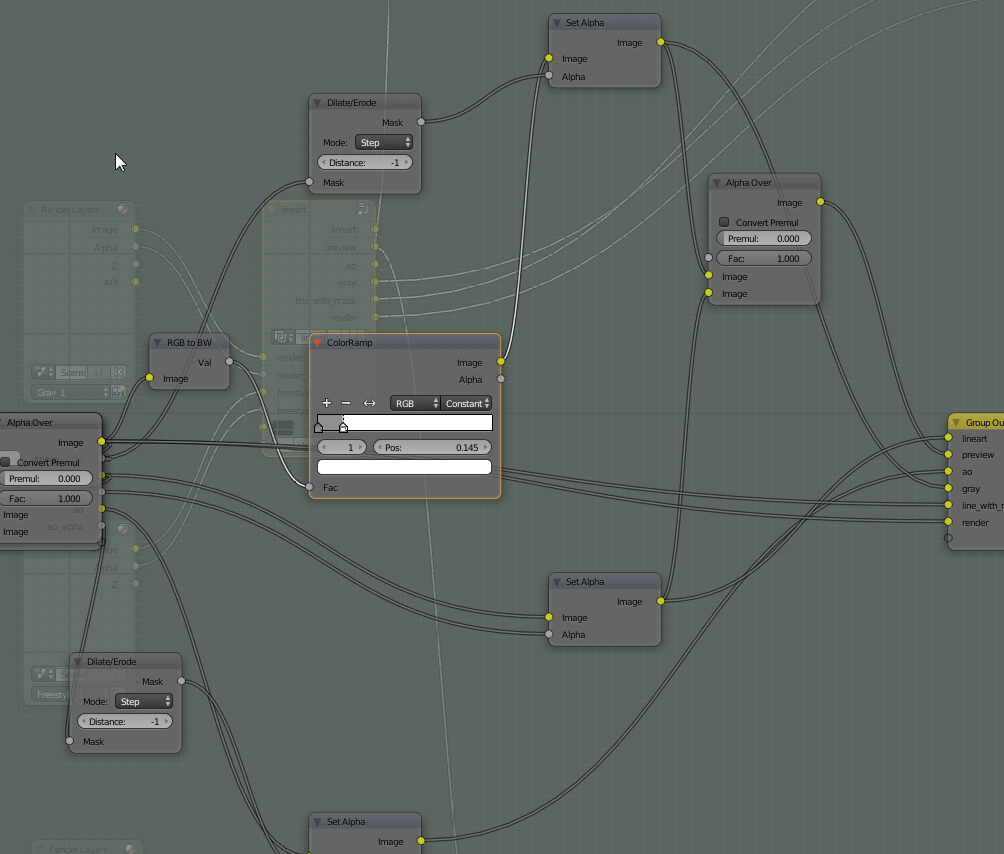
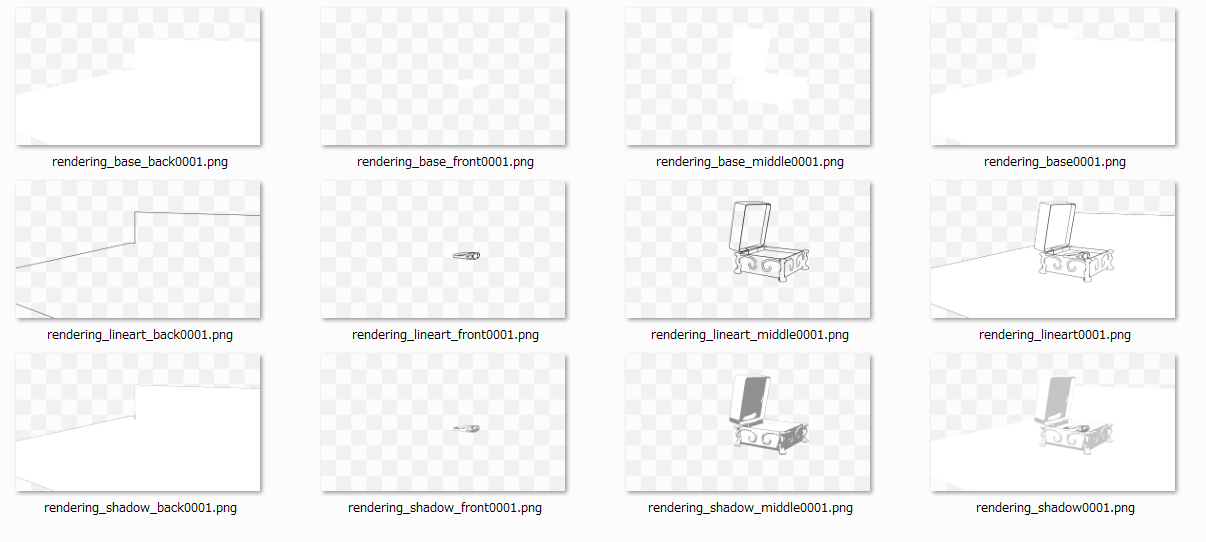


 それぞれに分割レンダリングすることにより、いっぺんにやるよりも負荷を抑えます


 https://github.com/kuromook/blender-lineart-node